Introduction to Branches and Pull Requests for Beginners.
August 23rd, 2020 • 5 min read
Branches and pull requests are essential to the GitHub workflow, they help developers collaborate on projects simultaneously. If you’ve never heard of them that’s okay. My goal in this tutorial is to help you understand what they are and how they are used when working on repositories.
What are Branches?
A branch simply put is an isolated environment that is created from the main branch. It allows you to experiment on new ideas or makes bug fixes without affecting the main branch or being affected by the changes committed by others.
You can use branches to safely develop and test new features.
When the features are ready and approved, a pull request is opened to review the changes you made before being merged into the main branch.
What are pull requests?
A pull request is a feature that allows you to inform others of the changes you’ve made to the repository through your branch. It allows you to share screenshots and general ideas or seek help when you’re stuck.
The repository owner reviews the work you’ve done on your branch and they can get back to you either for more info or to point out a bug you may have missed. Once the pull request has been reviewed and approved, the branch is merged with the master branch.
Creating a branch
In order to create a branch. Open the repository on your computer and then open terminal or git cli and use the following command.
git branch readme-edits
git branch is a git command used to create branches; This command creates a branch from the current branch you’re working from.
It is followed by the name you’d like to assign your new branch. In this case I’ll call it readme-edits since I want to edit the README.md file.
Branch names cannot include spaces, the command will fail if you do so.
Switch to the branch
To switch to the branch you just created use the command
git checkout
git checkout readme-edits
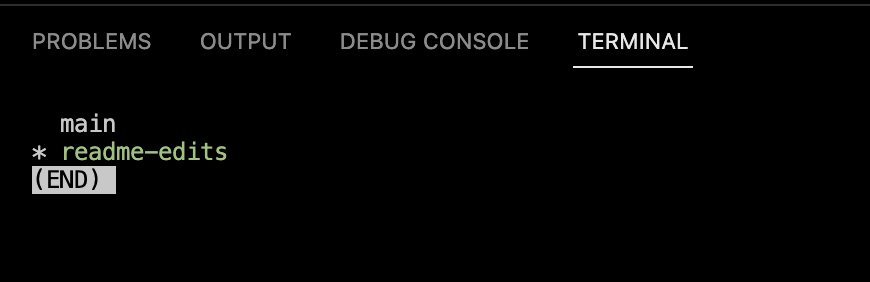
git checkout is followed by the name of the branch you would like to switch to. If you want to confirm what branch you’re on, use the git branch command.
The branch highlighted in green with an asterisk is your current working branch.
Commit changes
Open the README.md file make some changes then save the file.

After editing the file, we can now push the new branch we just created to GitHub along with the changes we just made to the README file.
-
Add the file to staging.
terminalgit add README.md -
Commit the changes with a message
terminalgit commit -m "Updated the readme file" -
Push the changes to GitHub
Since we are pushing a new branch to the repo we will use the
--set-upstreamflag to create a new branch on ouroriginremote. Lastly we specify the name of the branch which should be the same as the one created locally.terminalgit push --set-upstream origin readme-editsThis command is used when pushing changes in a branch for the first time. You only need to set the upstream once, afterwards you can just use
git push.
Opening a Pull Request
After your changes have been pushed, open a pull request, so that the repository owner (in this case it’s you) can review your work and merge it with the main branch.
In the top pane click on the Pull requests tab.

Immediately after opening you will receive a prompt to Compare & pull request since GitHub has noticed new changes that are not in the main branch.
Click on the Compare & pull request button.

After clicking the button you will see the window below, here you can add a more in-depth explanation of the changes you made,
you can also add images, emojis, links using markdown.
This will be visible to those reviewing your pull request. Finally click on create pull request.

Once you’ve created a pull requests, you are free to continue making more changes to the same branch and pushing them.
All your commits to that branch will be added to the pull request, the changes made will be visible within the Files changed tab.

Merging a pull request
Once your changes have been verified, you may merge them into your main branch. Click Merge pull request then click confirm merge.
Seeing the box down below confirms that it has been merged. You can also delete the branch as well.

Update your local setup
Even though we have merged the branch on GitHub, locally the changes haven’t been updated.
-
1. Switch to main branch
terminalgit checkout main -
2. Pull in the changes from GitHub
terminalgit pull -
3. Delete the merged branch locally
Delete the branch locally using
git branchfollowed by the-dflag and lastly the name of the branch to delete.terminalgit branch -d readme-edits
These are the basics you need to know when creating branches and opening pull requests.
Thank You for Reading ❤️