Introduction
Hey there 👋🏽, In this article I’m going to integrate Stripe into my Timeship. The Timeship is built with Gatsby. It uses Auth0 to authenticate users before they can travel. The user enters a location, a year and the travel data is saved to a base on Airtable. All of this is made possible by Gatsby’s Serverless functions.
What is Stripe?
Stripe is a payment infrastructure that allows you to accept payments and send payouts. Its easiness of setting up is one of the factors that has made it a favorite among developers and even folks without any technical experience.
Objective
Our task is to charge 50 dollars for every trip, that’s where Stripe comes in.
Step 1: Setup your Stripe account
To use Stripe we need to create an account. The account will start in test mode (which is fine since it has everything we need).
Step 2: Create a product

The product our customers will be paying for is the Timeship ticket. So, we add the product on Stripe with the price, mode of payment and other details.

Step 3: Setup Stripe on the Timeship
Install Stripe using npm or yarn.
yarn add stripe
Get the Stripe secret key from the “API Keys” section on the dashboard and set it as STRIPE_SECRET_KEY in your .env.development file.
The secret key should only be used server-side.
Step 4: Create Stripe Checkout session
A checkout session is what the customer will see, as they pay for their ticket through the Stripe checkout page we'll redirect them to. Below is a serverless function that accepts a POST request with customer details and returns a checkout url.
const stripe = require('stripe')(process.env.STRIPE_SECRET_KEY)

export default async handler(req, res){
//POST request handler
  if(req.method === "POST"){
    const { email, year, location, cancelUrl, successUrl } = req.body;

		try{
			const session = await stripe.checkout.sessions.create({
				success_url: successUrl,
				cancel_url: cancelUrl,
				payment_method_types: ["card"],
				line_items: [{ price: "your pricing api id here", quantity: 1 }],
				mode: "payment",
				customer_email: email,
				metadata: {
					email,
					year,
					location,
				},
        	});
        	return res.status(200).json({ url: session.url });
		} catch(error) {
			return res.status(error.status || 500).json({
            status: error.status || 500,
            message: error.message,
        	});
		}
	}
	return res.status(405).json({ message: "Bad request" });
}
- The
success_urlis the page stripe redirects to when payment is successful. If the user clicks on the “back” button, stripe redirects them to thecancel_url payment_method_typesspecifies the method we would like customers to use to pay us.line_items, lists items the customer wants to buy. In our case it’s just one time travel ticket. Thepriceproperty is set to thepricing api idof the product we created earlier in step 2.

modehas three enumerators: payment, setup and subscription. It’s currently set topaymentsince it’s a one time payment.customer_email, Its value will be used when the customer object is created. If not provided, the customer will be asked to enter their email on the checkout page.metadataextra details we may want to save about the transaction. In our case we are saving the email, year and location which will be helpful at a later point
Once a session is created, Stripe returns a url that we redirect our users to pay from. To test the Stripe checkout page we can use one the test cards Stripe provides; 4242 4242 4242 4242

Step 5: Successful payment page
Once the payment is successful, Stripe redirects the user to the success url. Stripe will also append session_id as a query param.
Before we show the success message, we make a GET request to our serverless function with the session id in the params to confirm the payment status.
const stripe = require('stripe')(process.env.STRIPE_SECRET_KEY)
export default async handler(req, res){
// POST request handler
...
//GET REQUEST HANDLER
if(req.method === "GET"){
const session = await stripe.checkout.sessions.retrieve(req.query.sessionId);
if (session.payment_status !== "paid") {
throw new Error("You haven't paid for your ticket 👮🏽♀️🚨");
}
res.status(200).json({ message: "Success");
}
}
Step 6: Create webhook endpoint
This is the most important part because it determines whether you get to travel. Think of it as the ticket inspector 👮🏽♂️.
I created an endpoint that Stripe makes POST request to immediately payment is complete. The serverless function runs three functions when called which I will dive into individually.
import axios from "axios";
import createError from "http-errors";
const stripe = require("stripe")(process.env.STRIPE_SECRET_KEY);

export default async function handler(req, res) {
	try {
		if (req.method === "POST") {
			const { type, data } = req.body;

			// Check event type and payment status
			const session = await checkEventAndStatus(type, data);

			// Check if ticket is being re-used
			await checkTicketReuse(session.id);

			// Save travel details to Airtable
			await saveToAirtable(session);

			return res.status(201).json({
				status: 201,
				message: `success`,
			});
		}
		return res.status(401).json({ message: "Method not allowed" });
	} catch (error) {
		return res.status(error.status).json({ message: error.message });
	}
}
The first function checkEventAndStatusreceives the type and data properties from the body of the request
and uses them to identify the type of event coming from a Stripe webhook,
and also the status of the payment. The function returns an object with details about the checkout session.
async function checkEventAndStatus(type, data) {
if (type !== "checkout.session.completed") {
throw createError(401, "Event type not allowed");
}
const stripeSession = await stripe.checkout.sessions.retrieve(data.object.id);
if (stripeSession.payment_status !== "paid") {
throw createError(402, "You haven't paid for your ticket 👮🏽♀️🚨");
}
return stripeSession;
}
The second function checkTicketReuse accepts the session id which it uses to cross-check with past completed
session ids on my airtable base in case someone tries to re-use a ticket.
async function checkTicketReuse(sessionId) {
	const travellers = await axios.get(
		`https://api.airtable.com/v0/${process.env.AIRTABLE_BASE_KEY}/users`,
		{
			headers: {
				Authorization: `Bearer ${process.env.AIRTABLE_API_KEY}`,
			},
		}
	);

	const records = travellers.data.records;

	const foundTicket = records.find(
		(passenger) => passenger.fields.ticket === sessionId
	);

	if (foundTicket) {
		throw createError(401, "This ticket has already been used");
	}
}
The last function saveToAirtable accepts the session object to retrieve the metadata which we stored
earlier in Step 4 and saves the travel details to Airtable.
async function saveToAirtable(session) {
	const currentTimestamp = Math.floor(Date.now() / 1000);
	await axios.post(
		`https://api.airtable.com/v0/${process.env.AIRTABLE_BASE_KEY}/users`,
		{
			records: [
				{
					fields: {
						email: session.metadata.email,
						year: parseInt(session.metadata.year),
						location: session.metadata.location,
						ticket: session.id,
						timestamp: currentTimestamp,
					},
				},
			],
		},
		{
			headers: {
				Authorization: `Bearer ${process.env.AIRTABLE_API_KEY}`,
			},
		}
	);
}
Step 7: Setup webhook on Stripe
For the previous step to work we need to setup a webhook on the Stripe dashboard.
Head over to the webhooks section and click on “Add endpoint”. Start by installing the Stripe CLI to test the webhook locally. You can find the installation guide here.
Make sure to forward your events to the port your app is running on. For Gatsby we use port 8000 followed by the endpoint path.
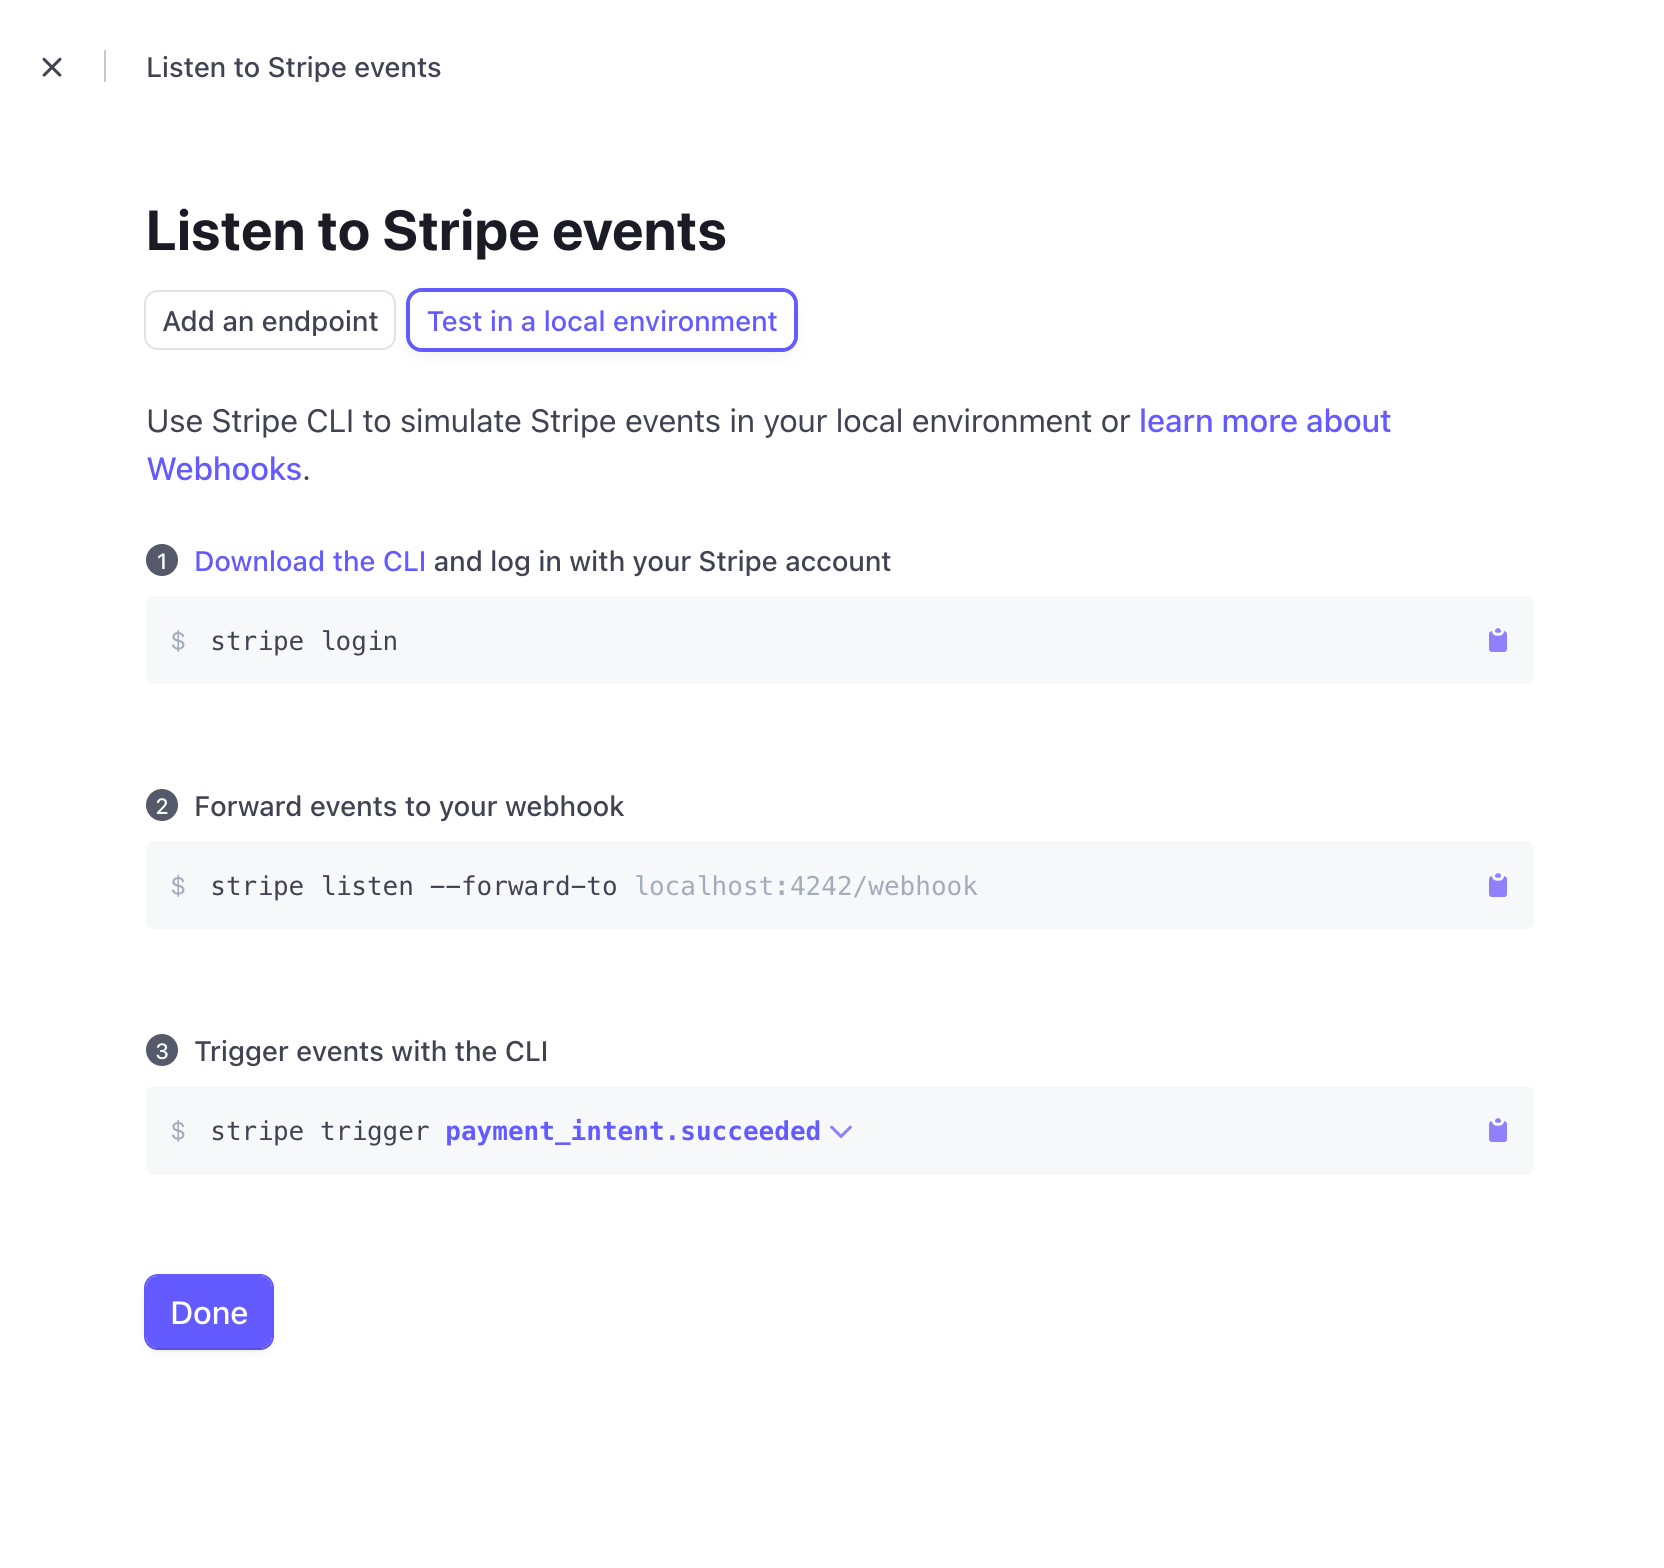
With this set you can be able to test the webhook locally before deploying your application.
Once the application is deployed you can add the url of the endpoint to the Add an endpoint section. Make sure to select the checkout.session.completed event.

And with that you can now travel through space and time 🚀.
Feel free to checkout the deployed Timeship and the code on GitHub
Thank you for reading ❤️